eavyMetal
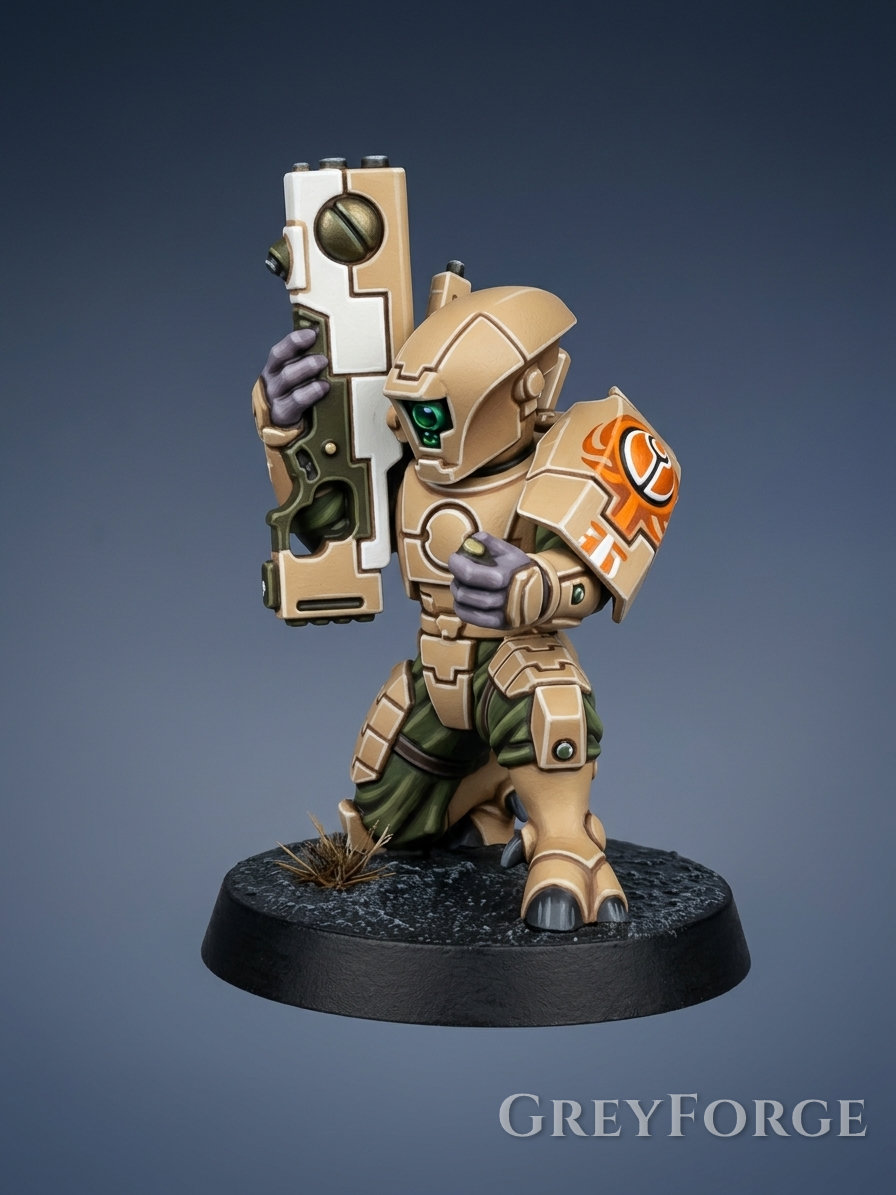
Sandspeak Vanguard
by @BigFella • 15/08/2026
Click to enlarge
Paint Your Own Models
Want to try this color scheme? Download GreyForge to colorize your photos, get step-by-step guides, and improve your painting!
Master's Recipe
A guide to painting a desert-specialist warrior using Monument Hobbies Pro Acryl paints, focusing on clean panel lines, high-contrast armor, and vibrant olive accents.
Colors By Part
Armor Panels
Tan
Standard
Ivory
Standard
Coal Black
Standard
Under-suit and Fabrics
Dark Olive
Standard
Camo Green
Standard
Pulse Carbine
Titanium White
Standard
Coal Black
Standard
Tan
Standard
Helmet Lens and Glows
Jade
Standard
Bright Green
Standard
Sept Markings
Burnt Orange
Standard
Orange
Standard
Painting Steps
Armor Foundation
- • Apply a smooth basecoat of Tan to all armor sections.
- • Use Coal Black to fill in the deep recesses and panel gaps for maximum separation.
Fabric and Skin
- • Paint the undersuit and pant sections with Dark Olive .
- • Highlight the folds of the cloth with Camo Green .
- • Paint the exposed skin on the hands with a mix of Coal Black and a touch of Tan to create a grey-lavender tone.
Edge Highlighting
- • Apply a sharp edge highlight to every corner and edge of the Tan armor using Ivory .
- • Concentrate the Ivory highlight on the upper edges where light hits most directly.
Weaponry Details
- • Basecoat the weapon casing with Titanium White .
- • Paint the mechanical frame and handle of the weapon with Coal Black .
- • Add Tan to the barrel shroud and circular side details to match the armor.
Optical Lens
- • Fill the lens area with Jade .
- • Add a small dot of Bright Green in the center of the lens to simulate a powered-on glow.
Unit Iconography
- • Carefully freehand or color the shoulder emblem with Burnt Orange .
- • Add a smaller highlight within the orange shapes using Orange .
Share Gateway ID: 5d5dfced