
Eavy Metal
Grand Priest (Dragon Ball Super)
by Painter • 04/10/2026
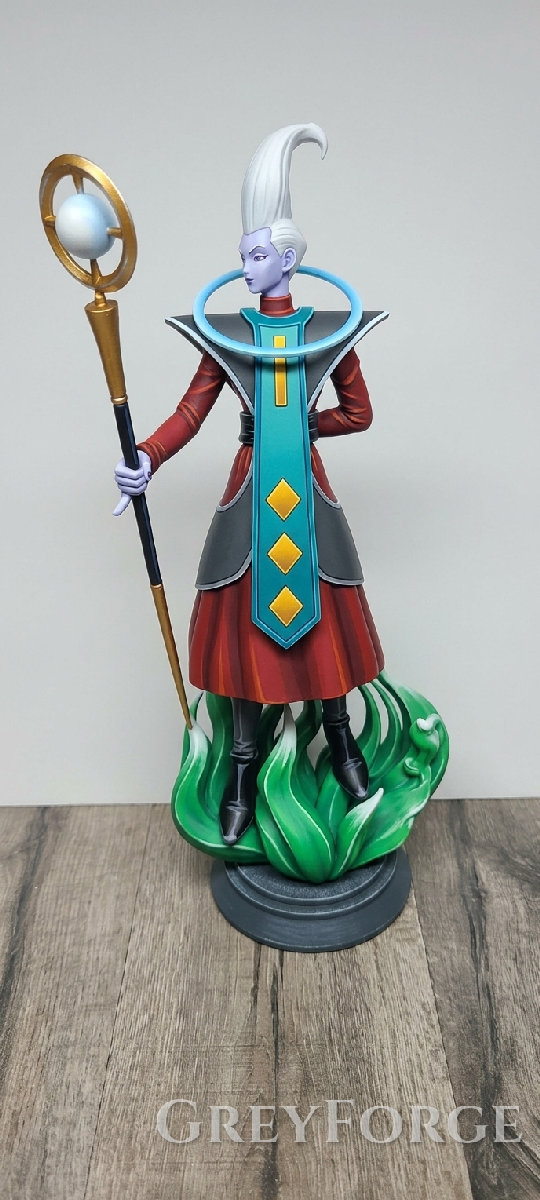
Click to enlarge
Paint Your Own Models
Want to try this color scheme? Download GreyForge to colorize your photos, get step-by-step guides, and improve your painting!
Master's Recipe
A colour-matched guide for the Grand Priest from Dragon Ball Super, recreating his pale lavender skin, swept-back white hair, red robes, turquoise tabard, gold staff, and vivid green base.
Colors By Part
Face, ears, and hands
Daemonette Hide
Standard
Dechala Lilac
Standard
Pallid Wych Flesh
Standard
Druchii Violet
Wash
Abaddon Black
Standard
White Scar
Standard
Hair
Grey Seer
Standard
Ulthuan Grey
Standard
White Scar
Standard
Drakenhof Nightshade
Wash
Red robe, sleeves, and collar
Khorne Red
Standard
Mephiston Red
Standard
Evil Sunz Scarlet
Standard
Wild Rider Red
Standard
Carroburg Crimson
Wash
Dark grey shoulder and side panels
Mechanicus Standard Grey
Standard
Eshin Grey
Standard
Dawnstone
Standard
Administratum Grey
Standard
Nuln Oil
Wash
Turquoise tabard and neck ring
Incubi Darkness
Standard
Sons of Horus Green
Standard
Temple Guard Blue
Standard
Baharroth Blue
Standard
Aethermatic Blue
Contrast
Gold trim, tabard emblems, and staff fittings
Retributor Armour
Metallic
Liberator Gold
Metallic
Auric Armour Gold
Metallic
Averland Sunset
Standard
Yriel Yellow
Standard
Agrax Earthshade
Wash
Staff shaft and boots
Abaddon Black
Standard
Eshin Grey
Standard
Dawnstone
Standard
Nuln Oil
Wash
Staff orb
Grey Seer
Standard
Aethermatic Blue
Contrast
White Scar
Standard
Green sculpted base and flame-like foliage
Caliban Green
Standard
Warpstone Glow
Standard
Moot Green
Standard
Gauss Blaster Green
Standard
White Scar
Standard
Biel-Tan Green
Wash
Round base
Mechanicus Standard Grey
Standard
Dawnstone
Standard
Administratum Grey
Standard
Nuln Oil
Wash
Painting Steps
Step 1: Paint the lavender skin
- • Apply thin coats of Daemonette Hide to the face, ears, and visible hands.
- • Shade the recesses around the nose, jaw, fingers, and ear with carefully placed Druchii Violet . Keep the wash out of broad, smooth areas.
- • Layer Dechala Lilac over the raised facial planes, knuckles, and fingertips, leaving the deeper areas shaded.
- • Add small, gentle highlights with Pallid Wych Flesh . If this looks too pale, blend it with a little Dechala Lilac .
- • Paint the brows and eye details with Abaddon Black . Add tiny White Scar accents for the eye glints.
Step 2: Shade and highlight the hair
- • Cover the hair with Grey Seer , working the paint into the long swept-back shape and the shorter ridges around the head.
- • Apply a very light, controlled recess shade of Drakenhof Nightshade along the hair grooves. If needed, thin the shade with water before applying it so it does not stain the broad hair surfaces.
- • Layer Ulthuan Grey along the raised ridges, then use White Scar on the brightest crest and curled tip.
Step 3: Paint the red robe
- • Paint the robe, sleeves, and collar with Khorne Red . Let the base coat settle into the folds before adding highlights.
- • Shade the deepest folds with a small amount of Carroburg Crimson . Keep the shade focused in the recesses to avoid an overly purple finish.
- • Layer Mephiston Red over the main raised sections of the sleeves and robe, leaving Khorne Red visible in the shadowed folds.
- • Add narrow highlights to the prominent creases with Evil Sunz Scarlet , and use Wild Rider Red sparingly on the sharpest folds and hem.
Step 4: Finish the grey panels
- • Basecoat the shoulder and curved side panels with Mechanicus Standard Grey .
- • Shade panel edges and recessed joins with Nuln Oil . Once dry, reinforce broad shadowed sections with Eshin Grey .
- • Highlight the raised panel surfaces and inner folds with Dawnstone . Finish the sharp outer edges with fine lines of Administratum Grey .
Step 5: Paint the turquoise tabard and ring
- • Paint the long central tabard and circular neck ring with Incubi Darkness , taking care around the skin and grey shoulder pieces.
- • Layer Sons of Horus Green across the tabard and ring, leaving the darkest shade around their borders and in recessed areas.
- • Add a broad highlight of Temple Guard Blue down the tabard's raised center and along the ring's upper surface.
- • Use Baharroth Blue for narrow edge highlights. Apply Aethermatic Blue as a thin, controlled glaze only where you want a lighter turquoise transition.
Step 6: Add the gold details
- • Paint the tabard emblems and narrow yellow stripe with Averland Sunset . Keep the shapes neatly inside their raised borders.
- • Layer Yriel Yellow over the center of each emblem and stripe, leaving a thin Averland Sunset edge for depth.
- • Paint the staff's upper fitting and oval frame with Retributor Armour . Shade joins and undersides with Agrax Earthshade .
- • Highlight the raised gold edges of the staff with Liberator Gold , then add a few restrained brightest points with Auric Armour Gold .
Step 7: Paint the staff shaft and boots
- • Paint the staff shaft and boots with Abaddon Black , taking care to leave the gold fittings clean.
- • Add narrow reflections along the shaft, boot toes, and raised boot edges with Eshin Grey , then place smaller accents of Dawnstone on the brightest edges.
- • Use Nuln Oil in boot seams and around the staff fittings to deepen the dark recesses.
Step 8: Paint the staff orb
- • Paint the orb Grey Seer as a smooth, even base.
- • Glaze Aethermatic Blue lightly across the orb, leaving a pale central area and allowing the blue to gather slightly around its edge.
- • Add a small, crisp reflection with White Scar near the upper edge of the orb.
Step 9: Paint the green sculpted base
- • Paint the sculpted green base with Caliban Green , reaching into the spaces between the curling forms.
- • Shade recessed channels with Biel-Tan Green . Re-establish the raised surfaces with Warpstone Glow .
- • Layer Moot Green along the prominent ridges and curved tips, following the direction of each sculpted strand.
- • Apply narrow highlights of Gauss Blaster Green along the brightest flowing edges. Use White Scar sparingly on the sharpest tips to echo the pale accents in the reference.
Step 10: Finish the round base
- • Paint the round base Mechanicus Standard Grey , then shade its edge and recessed details with Nuln Oil .
- • Highlight the raised rim with Dawnstone and finish its sharp upper edge with Administratum Grey .
- • Check the figure for stray marks and restore nearby areas with their original colours where needed.
Share Gateway ID: ad639d68